1/72 DHC-4 Caribou prototype - Hobby Craft
Re: 1/72 DHC-4 Caribou prototype - Hobby Craft
![]() by hrtpaul » Sun May 12, 2019 3:25 pm
by hrtpaul » Sun May 12, 2019 3:25 pm
Bloody hell mate. That's looking great 
Head A/CAM Phantom Phanatic, Shit Stirrer and Karma Bus Driver toot toot 
- hrtpaul
- Posts: 4121
- Joined: Sat Apr 12, 2014 10:44 am
- Location: Like I'm gonna tell you lot
Re: 1/72 DHC-4 Caribou prototype - Hobby Craft
![]() by 72linerlover » Tue May 21, 2019 2:38 am
by 72linerlover » Tue May 21, 2019 2:38 am
Unusual monday update.
As you can see from this manual page, the retracting kinematic is really complicated. It has nothing to do with what is in the kit.

Another point is that the prototype had a three parts gear doors and not two parts as in the series aircraft. There also are photos in which the doors are not visible, maybe sometimes because they weren't there or were closed (the front ones, at least).

So I started adding some structure inside the gear wells.


After that, I prepared the rear door and the parts to complete the nacelles underside. In the series aircraft are not present, since substituted by the long two doors. (difficult to explain, but I hope you get the point)

Here the parts

and here in place.

Here a test fit of all the elements. The rear door still has to be cut to size.

Thanks for watching
Best regards
Eugenio
As you can see from this manual page, the retracting kinematic is really complicated. It has nothing to do with what is in the kit.
Another point is that the prototype had a three parts gear doors and not two parts as in the series aircraft. There also are photos in which the doors are not visible, maybe sometimes because they weren't there or were closed (the front ones, at least).
So I started adding some structure inside the gear wells.
After that, I prepared the rear door and the parts to complete the nacelles underside. In the series aircraft are not present, since substituted by the long two doors. (difficult to explain, but I hope you get the point)
Here the parts
and here in place.
Here a test fit of all the elements. The rear door still has to be cut to size.
Thanks for watching
Best regards
Eugenio
- 72linerlover
- Posts: 70
- Joined: Thu Jul 21, 2016 2:50 am
- Location: Cremona, Northern Italy
Re: 1/72 DHC-4 Caribou prototype - Hobby Craft
![]() by Adam the Akrodude » Thu May 23, 2019 12:36 pm
by Adam the Akrodude » Thu May 23, 2019 12:36 pm
Masterful work - brilliant stuff!
- Adam the Akrodude
- Posts: 2819
- Joined: Mon Apr 14, 2014 1:02 pm
- Location: 100,124,672,897 Bifrost Rd, Valhalla, Asgard
Re: 1/72 DHC-4 Caribou prototype - Hobby Craft
![]() by 72linerlover » Mon Jun 17, 2019 3:22 am
by 72linerlover » Mon Jun 17, 2019 3:22 am
Back to the manual.
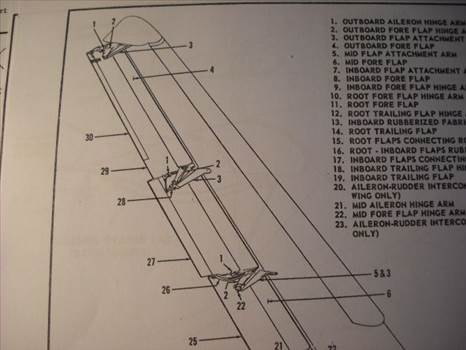
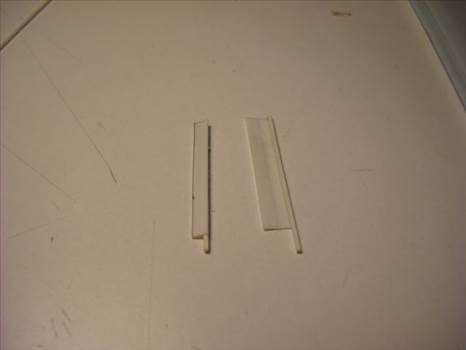
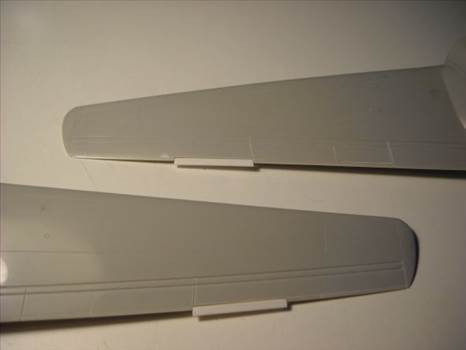
The two trim tabs that protrude after the trailing edge are a bit coarse. So I cut them off and redone with some styrene.

Following modification is valid also for the series aircraft and it is due to a minor error of the kit.
As you can see from the manual, the actuator and linkage of the outer aileron-flap (n.29) are aligned with the end of the trim tab (the newly done one).
Unfortunately the fixing hole in the kit wing is in the wrong position.
So I drilled a new one
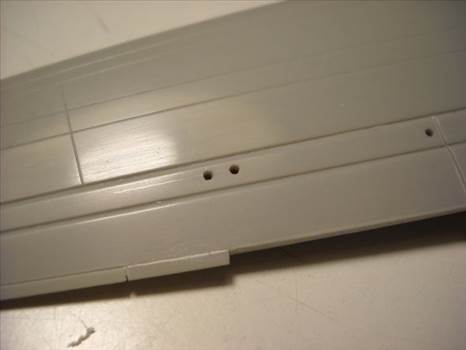
and closed the old one with some melted stretched sprue.
Sanded and polished.
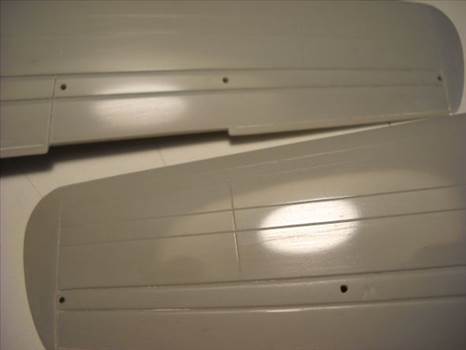
Another note: the little trim tab (n.30) is present only on the right wing. So it is better to deepen the engraved line to make it different from the left one.
Actually also the glazing is glued to the fuselage with 2 component clear epoxy and it is setting. Pics in the next days.
That's all for the moment.
Regards
Eugenio
The two trim tabs that protrude after the trailing edge are a bit coarse. So I cut them off and redone with some styrene.
Following modification is valid also for the series aircraft and it is due to a minor error of the kit.
As you can see from the manual, the actuator and linkage of the outer aileron-flap (n.29) are aligned with the end of the trim tab (the newly done one).
Unfortunately the fixing hole in the kit wing is in the wrong position.
So I drilled a new one
and closed the old one with some melted stretched sprue.
Sanded and polished.
Another note: the little trim tab (n.30) is present only on the right wing. So it is better to deepen the engraved line to make it different from the left one.
Actually also the glazing is glued to the fuselage with 2 component clear epoxy and it is setting. Pics in the next days.
That's all for the moment.
Regards
Eugenio
- 72linerlover
- Posts: 70
- Joined: Thu Jul 21, 2016 2:50 am
- Location: Cremona, Northern Italy
Re: 1/72 DHC-4 Caribou prototype - Hobby Craft
![]() by RayS » Mon Jun 17, 2019 8:48 pm
by RayS » Mon Jun 17, 2019 8:48 pm
I might have already said this before Euge, but great attention to detail.
Still following your build here and on ARC
Still following your build here and on ARC
Ray

-

RayS - Posts: 2172
- Joined: Thu Apr 17, 2014 10:24 am
- Location: RAdelaide!... YPAD
Re: 1/72 DHC-4 Caribou prototype - Hobby Craft
![]() by Graeme H » Tue Jun 18, 2019 8:01 am
by Graeme H » Tue Jun 18, 2019 8:01 am
72linerlover wrote:Back to the manual.
Following modification is valid also for the series aircraft and it is due to a minor error of the kit.
Eugenio
minor error, and here I thought the kit was plagued with errors, I must get stuck into mine, when I finish my Neptune, and you think Hobbycraft got the undercarriage wrong then don't look at the Hasegawa Neptune
Graeme
-

Graeme H - Posts: 1202
- Joined: Thu Jun 05, 2014 12:51 pm
- Location: YBTL TSV
Re: 1/72 DHC-4 Caribou prototype - Hobby Craft
![]() by 72linerlover » Thu Jun 27, 2019 11:42 pm
by 72linerlover » Thu Jun 27, 2019 11:42 pm
Hi Graeme.
With "minor error" I meant that it is an easy fixable issue.
Ok the Hobbycraft kits are not Tamiya quality, but not that bad as many may think.
At the end, without them, we weren't here speaking of Caribou or Dash8 or Buffalo in 1/72nd.
So, time for quick update.
Sometime when you check something you have done, it seems OK, but when you take pics for the forum, well, it's not.
I have a lot of cleaning and adjusting with the glazing. Nothing impossible but I have to be careful.


Something better with the tailplane hinges.


Also the fin is taking shape.


I hope to get some wings and fuselage together next time. Not soon, since I'm leaving tonight to Zeltweg for the F1 Gran Prix.
(I'm a big fan of Daniel Ricciardo and I'm sure he will do well in Austria, and hope Ferrari too) - the smile is not a smile, it is a Ricciardo's portrait!
Thanks for watching.
Regards
Euge
With "minor error" I meant that it is an easy fixable issue.
Ok the Hobbycraft kits are not Tamiya quality, but not that bad as many may think.
At the end, without them, we weren't here speaking of Caribou or Dash8 or Buffalo in 1/72nd.
So, time for quick update.
Sometime when you check something you have done, it seems OK, but when you take pics for the forum, well, it's not.
I have a lot of cleaning and adjusting with the glazing. Nothing impossible but I have to be careful.
Something better with the tailplane hinges.
Also the fin is taking shape.
I hope to get some wings and fuselage together next time. Not soon, since I'm leaving tonight to Zeltweg for the F1 Gran Prix.
(I'm a big fan of Daniel Ricciardo
Thanks for watching.
Regards
Euge
- 72linerlover
- Posts: 70
- Joined: Thu Jul 21, 2016 2:50 am
- Location: Cremona, Northern Italy
Re: 1/72 DHC-4 Caribou prototype - Hobby Craft
![]() by Uros » Fri Jun 28, 2019 3:33 am
by Uros » Fri Jun 28, 2019 3:33 am
Outstanding work, Eugenio!
Cheers!
Uros
Uros
-

Uros - Posts: 418
- Joined: Mon Aug 14, 2017 6:25 pm
- Location: Slovenia
Re: 1/72 DHC-4 Caribou prototype - Hobby Craft
![]() by 72linerlover » Wed Jul 10, 2019 3:11 am
by 72linerlover » Wed Jul 10, 2019 3:11 am
Thanks, Uros, you are way too kind.
So, glueing wings to fuselage.
Usually an easy task: you need the wings, possibly left and right, a fuselage, some glue... done.
Well this is not the case.
Probably due to my mistake when I forced the parts for the new dihedral, I missed the planarity of the root rib and the wings look down.
So now I need to sand it till I get again the correct dihedral.
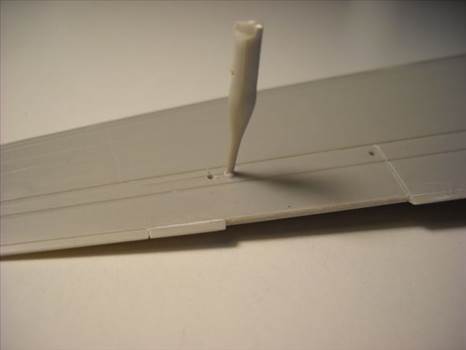
But, what to do to be sure that the future landing gears legs will be vertical?
I inserted two iron rods in the hole for said legs and I sanded till I can estimate them vertical.
The right wing is almost done

The left one is still to do.

Unfortunately, that's all.
Bye
Eugenio
So, glueing wings to fuselage.
Usually an easy task: you need the wings, possibly left and right, a fuselage, some glue... done.
Well this is not the case.
Probably due to my mistake when I forced the parts for the new dihedral, I missed the planarity of the root rib and the wings look down.
So now I need to sand it till I get again the correct dihedral.
But, what to do to be sure that the future landing gears legs will be vertical?
I inserted two iron rods in the hole for said legs and I sanded till I can estimate them vertical.
The right wing is almost done
The left one is still to do.
Unfortunately, that's all.
Bye
Eugenio
- 72linerlover
- Posts: 70
- Joined: Thu Jul 21, 2016 2:50 am
- Location: Cremona, Northern Italy
Re: 1/72 DHC-4 Caribou prototype - Hobby Craft
![]() by 72linerlover » Mon Aug 05, 2019 3:11 am
by 72linerlover » Mon Aug 05, 2019 3:11 am
Hi mates.
Some progress to report after a long time.
It has been a time consuming task to get a decent wing - fuselage fit. Also, the joint was very loose, so I added some plastic to the insert plates to get them more rigid.
This is the result.


I used epoxy glue to have a secure joint: I should have thought before and prepare some pins, but I didn't and at this time it would have been dangerous to drill anything in the fuselage, running the risk to have plastic powder floating inside the fuselage. Static electricity would have attracted them (sure) onto the windows. Don't ask how I know.
Then I secured the joints, filling the unavoidable gaps with some superglue. Quite difficult to tell in the following pics, but it is there and sanded.

Now it seems that the dihedhral is almost close to the real thing, or I hope so.

Now it's time to give her a bath an a good shot of primer, just to understand where I am.
Thanks for following
Eugenio
Some progress to report after a long time.
It has been a time consuming task to get a decent wing - fuselage fit. Also, the joint was very loose, so I added some plastic to the insert plates to get them more rigid.
This is the result.
I used epoxy glue to have a secure joint: I should have thought before and prepare some pins, but I didn't and at this time it would have been dangerous to drill anything in the fuselage, running the risk to have plastic powder floating inside the fuselage. Static electricity would have attracted them (sure) onto the windows. Don't ask how I know.
Then I secured the joints, filling the unavoidable gaps with some superglue. Quite difficult to tell in the following pics, but it is there and sanded.
Now it seems that the dihedhral is almost close to the real thing, or I hope so.
Now it's time to give her a bath an a good shot of primer, just to understand where I am.
Thanks for following
Eugenio
- 72linerlover
- Posts: 70
- Joined: Thu Jul 21, 2016 2:50 am
- Location: Cremona, Northern Italy
Return to Member's Works in Progress
Who is online
Users browsing this forum: No registered users and 5 guests