Nice job on the Ansett 743 Leigh.
I started one of these a couple of years ago but exchanged wing root assemblies. Needless to say I had no end of problems and the project was binned. I think I will have another go of it. I have the 2000 Olympic decals for it.
With the left overs I was going to do a SIA 744f.
My Boeing 747 Project
Re: My Boeing 747 Project
![]() by F-27pax » Mon Jul 14, 2014 1:51 pm
by F-27pax » Mon Jul 14, 2014 1:51 pm
Yes Ray, making the modification around the wing roots was my first thought too. Than I figured that since the main external difference between a 100/200 and a 300 was the extended upper deck it made sense to just change them over. I used the window line to measure where to cut horizontally and it all worked like a dream. As a bonus I now have a spare shorter upper deck from the 100/200 and a 400 fuselage with a hole in the top and they fit perfectly. Now, if I had some nice Qantas Cargo decals I could make a model of the aeroplane in your posts.
- F-27pax
- Posts: 973
- Joined: Fri Apr 18, 2014 11:40 pm
Re: My Boeing 747 Project
![]() by RayS » Tue Jul 15, 2014 11:29 am
by RayS » Tue Jul 15, 2014 11:29 am
As a matter of fact Leigh I have the decals for that scheme 
Scotty made up a set and I am using the roo from the Hawkeye A380 sheet which looks like a close fit. Peter has not had any new white decals (for the tail) printed for a while so I am making do with with what I can get my hands on.
After I sort out my ham fisted painting issues this one should be finished up soon (I hope!). The sheet was designed for the-8 but I sure it would fit on a -4.
Ray

-

RayS - Posts: 2172
- Joined: Thu Apr 17, 2014 10:24 am
- Location: RAdelaide!... YPAD
Re: My Boeing 747 Project
![]() by F-27pax » Wed Jul 30, 2014 1:02 am
by F-27pax » Wed Jul 30, 2014 1:02 am
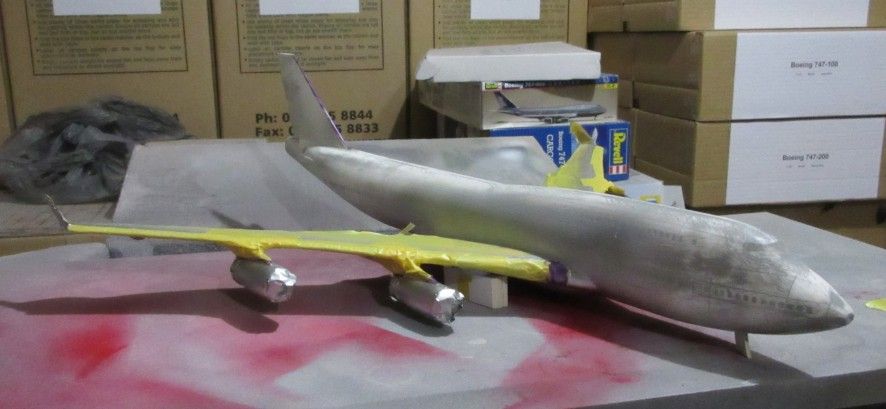
At last, some progress on my Qantas 747-400. How much do I loath masking!

- F-27pax
- Posts: 973
- Joined: Fri Apr 18, 2014 11:40 pm
Re: My Boeing 747 Project
![]() by RayS » Wed Jul 30, 2014 10:17 am
by RayS » Wed Jul 30, 2014 10:17 am
I hear ya!
Last edited by RayS on Wed Jul 30, 2014 10:17 pm, edited 1 time in total.
Ray
-
RayS - Posts: 2172
- Joined: Thu Apr 17, 2014 10:24 am
- Location: RAdelaide!... YPAD
Re: My Boeing 747 Project
![]() by hrtpaul » Wed Jul 30, 2014 6:19 pm
by hrtpaul » Wed Jul 30, 2014 6:19 pm
Yep not a fan of masking either 
Head A/CAM Phantom Phanatic, Shit Stirrer and Karma Bus Driver toot toot 
- hrtpaul
- Posts: 4121
- Joined: Sat Apr 12, 2014 10:44 am
- Location: Like I'm gonna tell you lot
Re: My Boeing 747 Project
![]() by F-27pax » Thu Aug 07, 2014 5:01 pm
by F-27pax » Thu Aug 07, 2014 5:01 pm
Out of the paint shop and on to the decalling. I've made myself a paper copy of the Brazil Decals decals and I'm trying to figure out where everything goes. The decals are well printed but the instruction sheet is useless so I'm peering at lots of photos of the original to work out how everything fits together. I'm beginning to feel like somebody trying to put together some furniture from Ikea and I hope I don't have any bits left over at the end of the process.

- F-27pax
- Posts: 973
- Joined: Fri Apr 18, 2014 11:40 pm
Re: My Boeing 747 Project
![]() by Graeme H » Thu Aug 07, 2014 7:42 pm
by Graeme H » Thu Aug 07, 2014 7:42 pm
OK Leigh, stating to get there now, can't wait to see her finished
Graeme
-

Graeme H - Posts: 1202
- Joined: Thu Jun 05, 2014 12:51 pm
- Location: YBTL TSV
Re: My Boeing 747 Project
![]() by F-27pax » Sun Aug 10, 2014 12:07 pm
by F-27pax » Sun Aug 10, 2014 12:07 pm
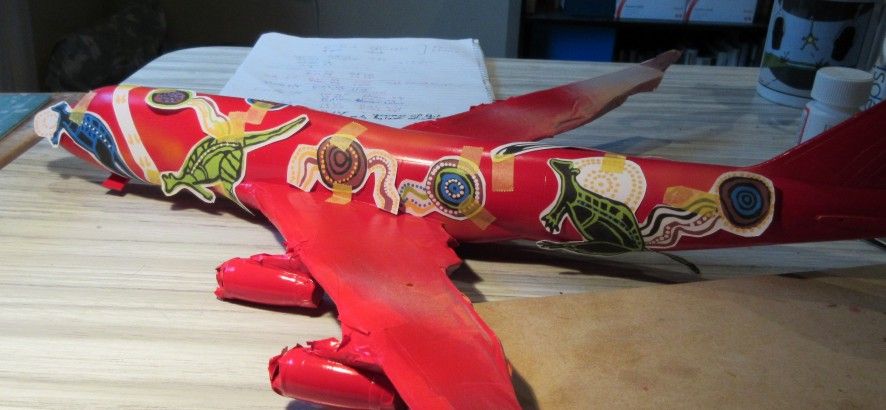
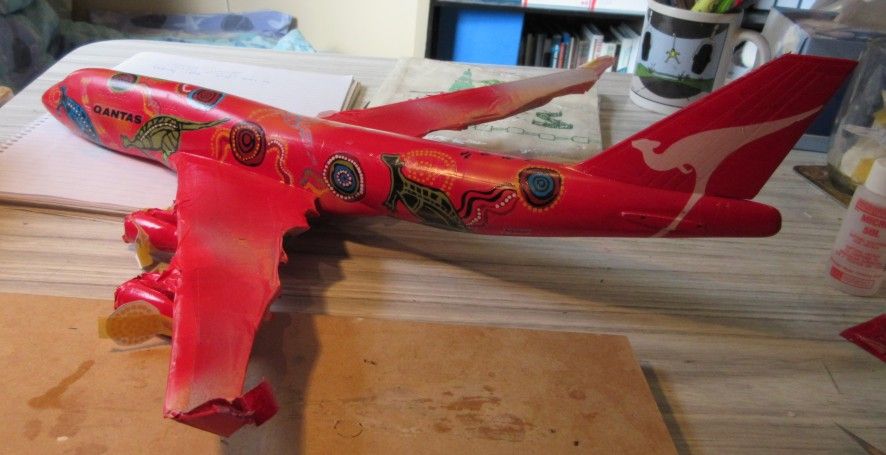
Here's a photo of the model with most of the Wunala Dreaming decals applied:
I had intended to wait until the model was completed before posting another picture but applying the Brazil Decals decals has presented some challenges so I thought I might write about them now before I forgot, for information of those who have the sheets and might want to use them in the future.
First, several people have commented that the decals are thick and need thinning. It is true that the decals look thick on the sheet and I guess that this was deliberate so that the colours on the sheet do not let the underlying red of the model show through. I was worried that the decals would not be thick enough and the show through would be too much of a problem, making it impossible to build a decent replica. But, no, the decals do not allow much show through and, although the kangaroo on the tail looks pink in the photo it is much whiter in the flesh. So, if you want to thin the decals after they have been applied I'd be careful about it.
On the other hand, the carrier film for the decals is thin. I tried one of the black registration numbers first and found that it fell apart fairly easily, so I applied one coat of Microscale Liquid Decal Film before starting to use the decals. On a couple of occasions there were breakages on some of the big decals as I pushed them around to get them lined up properly, but in general that worked fine. The decals settled down well, sometimes with a bit of encouraging with Micro Sol, even at the difficult curves of the wing leading edges where they meet the fuselage.
I used twenty or thirty photos of Wunala Dreaming found on Airliners.com to guide placement, since the instruction sheets are not very helpful. I then used paper copies of the decals to locate where all the decals should go on the model. At this stage I discovered that the decals are not entirely accurate when compared with the original aeroplane. After having located all the decals as accurately as I could I found that there were some of perhaps the right shape but the wrong colours, there are several linking 'paths' between the main pictures missing and I have a couple of little bits and pieces left over.
When it came to locating the decals on the model I used the door outlines to place the decals as accurately as possible on the model. You need to work out which decals to put down first as some of the images overlay each other, mostly kangaroo tails overlaying some of the circular images. Some of the shapes are not quite as they appear on the real aeroplane so a bit of jiggling around is necessary so that they all fit with reasonable accuracy.
The decals from the main sheet of images settled down with little trouble and very little silvering. However, the decals from the sheet with the windows, etc, showed exceptional silvering that took a lot of time and effort to overcome for the first few that I used. After that I solved the problem by using water with a lot of Aquadhere mixed in as the wetting agent, which solved the problem most of the time. Even so, there is a lot of work ahead in making them settle down perfectly. Hopefully things will look alright after a coat of clear varnish after all the decals are in place,
In summary, a few dramas along the way, but it's starting to look not so bad.
- F-27pax
- Posts: 973
- Joined: Fri Apr 18, 2014 11:40 pm
Re: My Boeing 747 Project
![]() by Graeme H » Mon Aug 11, 2014 7:34 am
by Graeme H » Mon Aug 11, 2014 7:34 am
It's good to see the decals worked mostly OK, as the Berger ad says "keep on keeping on"
When I originally got this sheet I had checked myself and thought some of the images may have been a little off, but in the scheme of things, unless someone is looking at a photo of the prototype and the model at the same time, they may never know, and let's face it Johnny public wouldn't have a clue.
Thanks for the heads up on the window decals, I will plan on not using them, and use a generic sheet instead.
I think it is possible you are the very first person I have seen use these decals, so good one, now, when are you doing a -300 and Nalanji Dreaming,
you know you want to
Graeme
-
Graeme H - Posts: 1202
- Joined: Thu Jun 05, 2014 12:51 pm
- Location: YBTL TSV
Return to Member's Completed Models
Who is online
Users browsing this forum: No registered users and 9 guests